To program a graphic LCD module for custom graphics, start by picking a display that matches your microcontroller and meets your project needs. Connect the LCD to your board with the right pin mapping from the datasheet. Use an image editor to create a graphic that fits the LCD resolution, and convert it into a data array using LCD Assistant, Bitmap2LCD, or Image2cpp.
Write your code with the proper library, such as U8g2, and send the image data to the LCD. Test the display, check the contrast, and make sure the graphic shows as expected. Use animation, different fonts, and buffer tricks for smoother results and better user interfaces. This guide walks you through every step, from hardware setup and image conversion to advanced code and troubleshooting, so you can solve any problem with your graphic LCD project(How Does DMA Improve Display Updates in Embedded Systems?).
How to Select and Understand Graphic LCD Modules for Your Project?

Projects often require specific resolutions like 128×64 or 240×128, depending on the level of detail needed. Monochrome displays are preferred for low-power applications, while color displays suit complex graphical interfaces. Interface types, such as SPI or I2C(What Are the Differences Between SPI and I2C for LCD Modules?), impact data transfer speed and hardware complexity, requiring careful selection based on your microcontroller’s capabilities.
To make this information accessible, a comparison table is provided below to highlight key factors for selecting graphic LCD modules:
| Feature | Monochrome | Color | SPI Interface | Parallel Interface |
|---|---|---|---|---|
| Resolution | 128×64, 240×128 | 320×240, higher | Varies | Varies |
| Power Consumption | Low | High | Moderate | Higher |
| Data Transfer Speed | Moderate | High | Slower | Faster |
| Use Case | Simple graphics | Complex visuals | Compact designs | High-speed applications |
How to Choose the Right Graphic Display for Your Needs?
Selecting a graphic display requires balancing resolution, display type, and interface with your project’s goals. 128×64 monochrome displays are ideal for low-power devices, while color displays with 240×128 resolution support advanced graphics. SPI interfaces are simpler to implement but slower, whereas parallel interfaces offer faster data transfer for dynamic visuals(Parallel vs Serial: Understanding Communication Methods).
Practical projects, such as a weather station prototype, often use monochrome 128×64 displays with SPI for simplicity and low power. A step-by-step checklist ensures you cover all key considerations:
- Define resolution needs: Choose 128×64 for basic graphics or 240×128 for detailed visuals.
- Select display type: Use monochrome for low power or color for vibrant interfaces.
- Match interface: Opt for SPI for compact setups or parallel for faster data transfer.
How Do Graphic LCD Controllers Impact Display Performance?
Graphic LCD controllers, such as ST7920, KS0108, or SSD1306, manage pixel data and communication protocols to ensure smooth display operation. ST7920 controllers support both serial and parallel modes, offering flexibility, while SSD1306 excels in low-power OLED displays. Key specifications like data bus width (e.g., 4-bit or 8-bit) and command sets determine compatibility and performance(How Do You Choose the Best Microcontroller or Processor for Your LCD Module Project?).
In real-world applications, like a custom dashboard project, the KS0108 controller was used for its robust 8-bit parallel interface, enabling fast updates for real-time data.
How to Set Up Hardware and Connect Pins for Graphic LCD Modules?
Proper hardware setup and pin connections are essential for graphic LCD modules to function correctly. You need to connect pins like VCC, GND, RS, E, and D0-D7 to your microcontroller, adjust contrast with a potentiometer, and power the backlight safely with a 220Ω resistor. This section explains these steps clearly to help you avoid errors and achieve a working display(How Should You Drive Backlight in an Embedded LCD Display?).
Pin connections require careful mapping based on the LCD’s datasheet, as miswiring can damage components. Arduino-based projects often use 5V logic with a potentiometer for contrast control, ensuring clear visuals. Separate power lines for logic and backlight reduce electrical noise, improving display stability(What Is the Right Way to Use Level Shifters With 3.3V LCD Modules in 5V Systems?).
Setup Checklist:
- Connect VCC and GND to 5V or 3.3V and ground on the microcontroller.
- Wire RS, E, and D0-D7 to digital pins per the datasheet.
- Attach a potentiometer to V0 for contrast adjustment.
- Use a 220Ω resistor for the backlight (pins A and K).
- Separate logic and backlight power lines to avoid interference.
How to Configure Pin Graphics for a Graphic LCD?
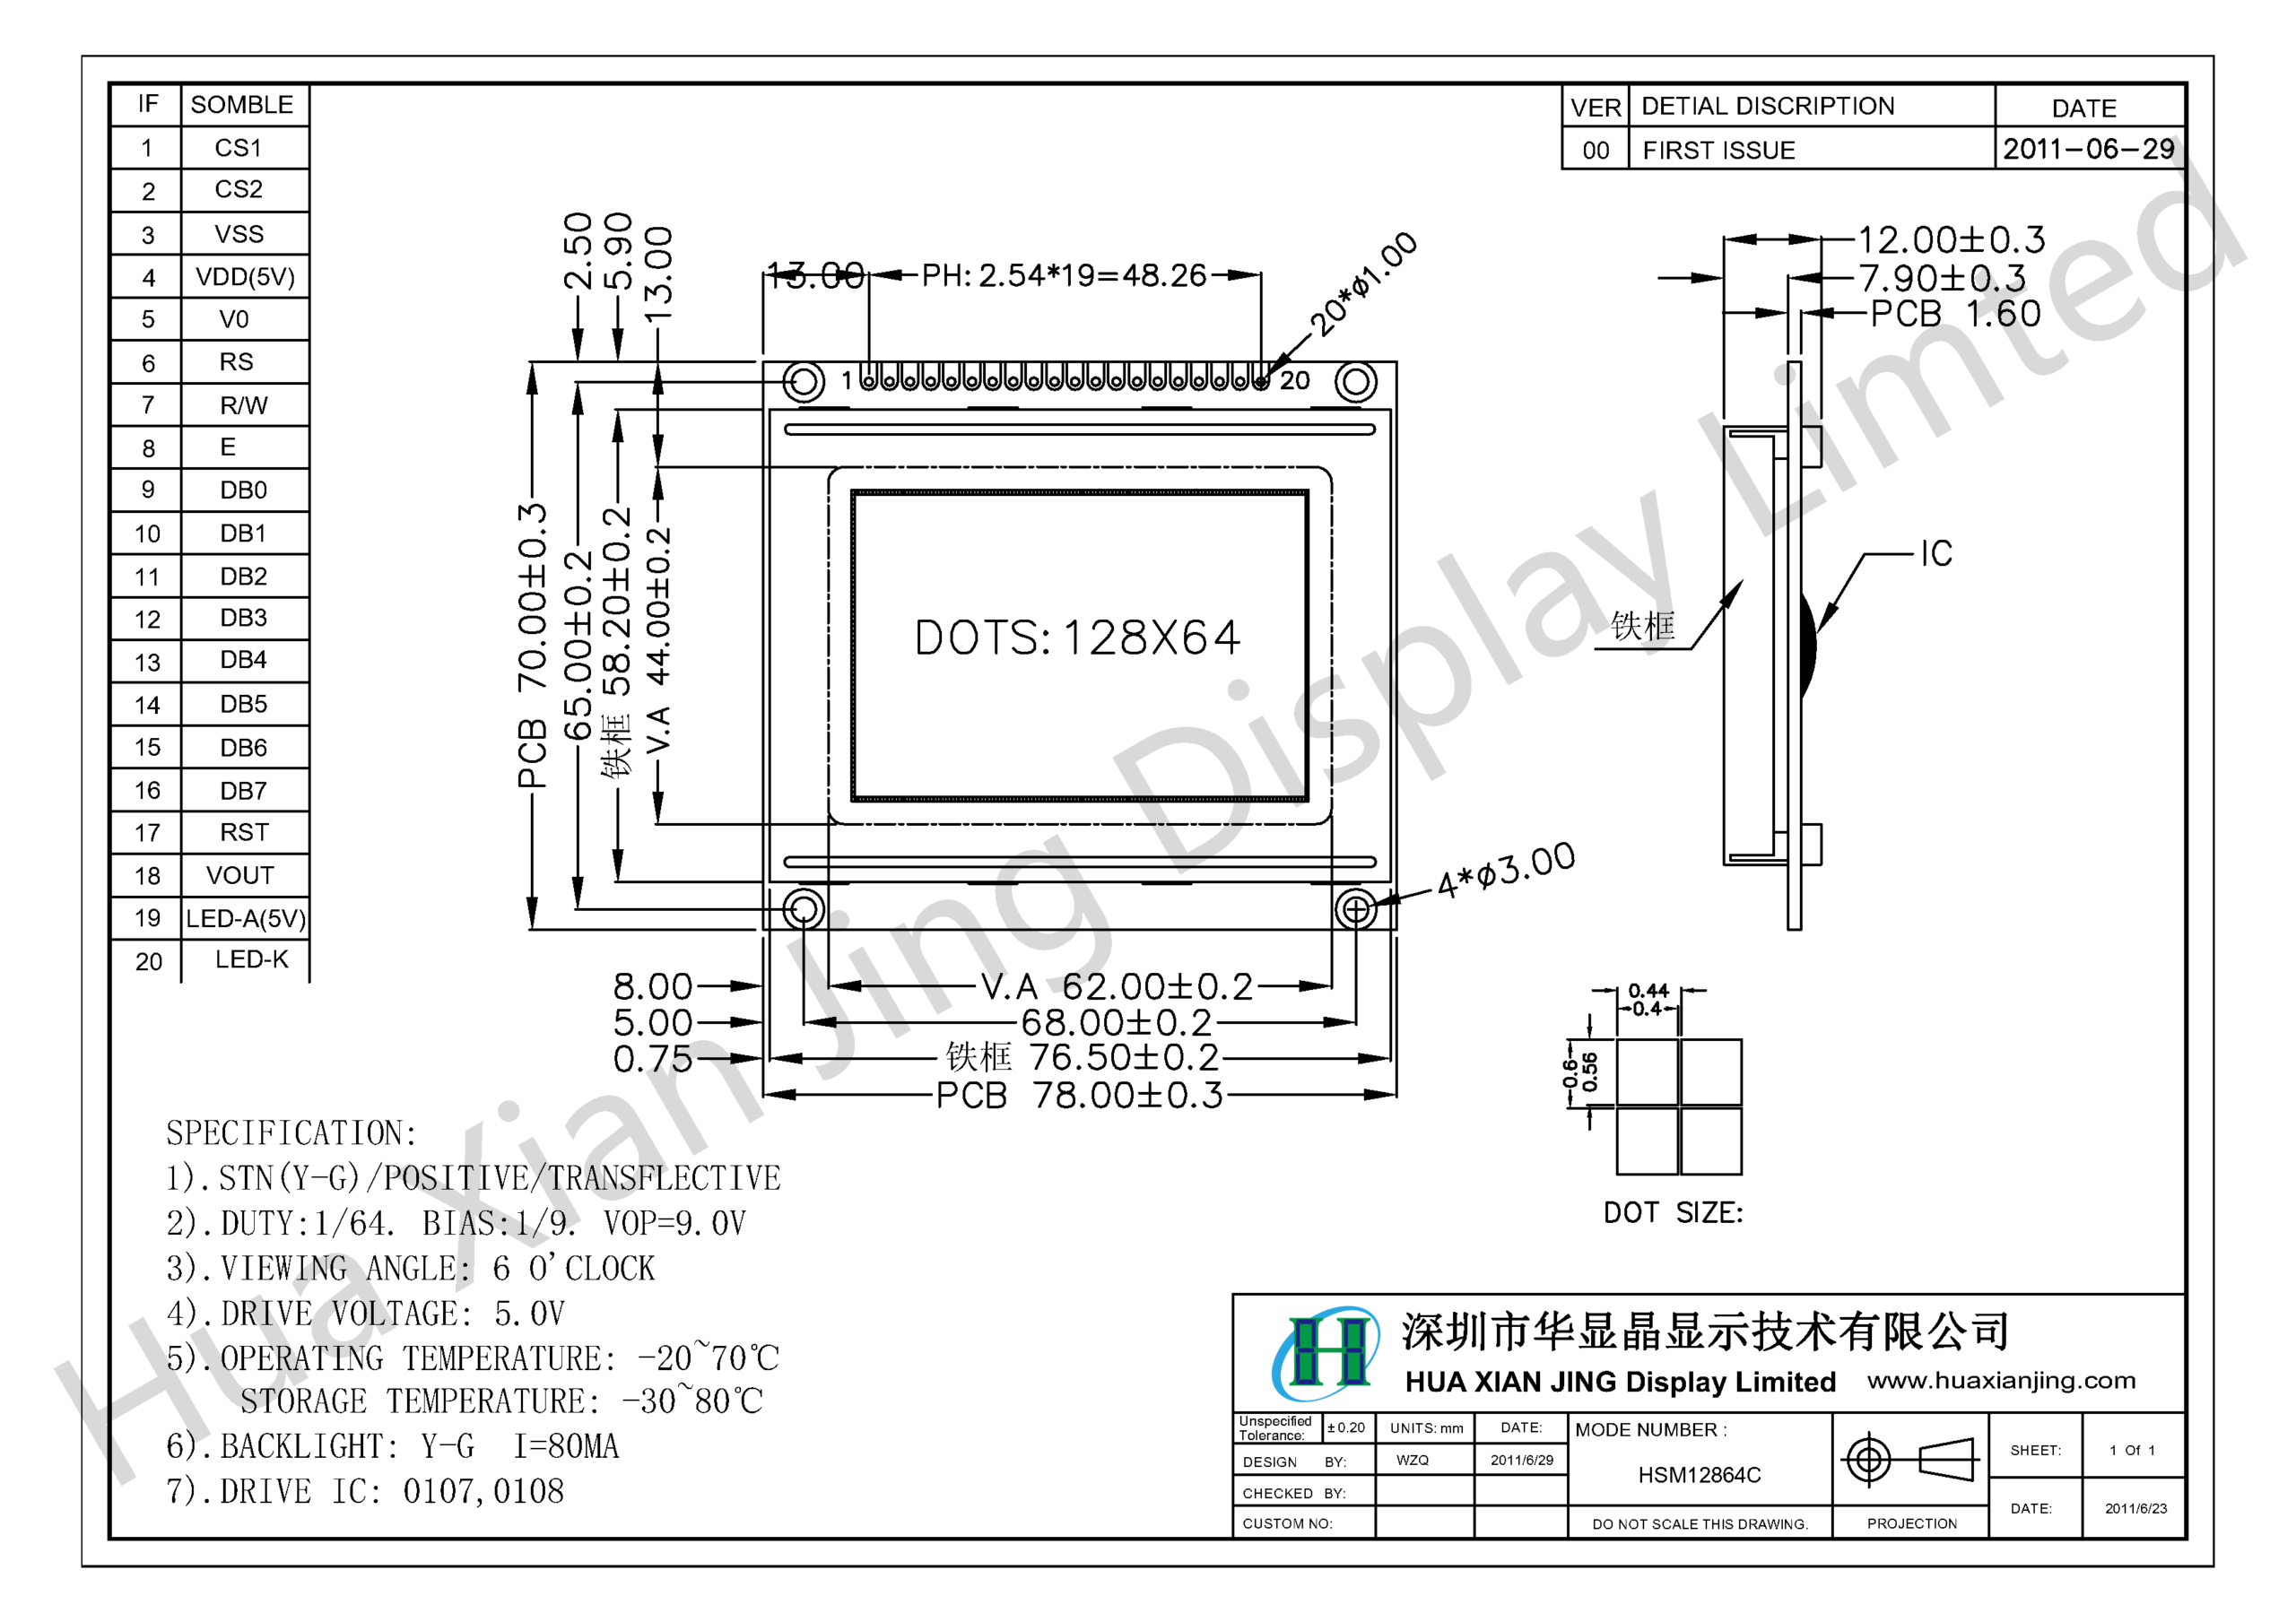
Pin configuration involves mapping VCC, GND, RS, E, D0-D7, and backlight pins (A, K) to your microcontroller. Datasheet-based pin mapping prevents errors in Arduino or Raspberry Pi projects. A potentiometer on the V0 pin allows precise contrast adjustment for clear visuals.
In a smart meter project, developers connected D0-D7 to Arduino digital pins and used a 10kΩ potentiometer for V0, achieving optimal display clarity.
Below is a pin connection table for clarity:
| LCD Pin | Function | Microcontroller Pin |
|---|---|---|
| VCC | Power supply | 5V or 3.3V |
| GND | Ground | GND |
| RS | Register select | Digital pin (e.g., D8) |
| E | Enable | Digital pin (e.g., D9) |
| D0-D7 | Data pins | Digital pins (e.g., D0-D7) |
| V0 | Contrast | Potentiometer wiper |
| A | Backlight anode | 5V via 220Ω resistor |
| K | Backlight cathode | GND |
How to Power and Set Up the Backlight for Stability?
Powering the LCD and its backlight requires supplying 5V or 3.3V and protecting the backlight with a 220Ω resistor. Current-limiting resistors* prevent backlight damage, and separate power lines reduce noise in 3.3V systems. This ensures stable operation across various microcontrollers.
In a portable sensor project, developers used a 5V supply for logic and a 220Ω resistor for the backlight, avoiding flickering issues. Below is a power setup guide:
Reparing Custom Graphics for Your Graphic LCD Module
To display graphics on your LCD module, start by creating images that align with its resolution, such as 128×64 pixels for common displays. Using an image editor, design your graphics to match these dimensions exactly and opt for monochrome (black-and-white) images if your LCD is a simpler model. This reduces data complexity and ensures compatibility.
Why It Matters
- Resolution Matching: If your image doesn’t match the LCD’s resolution (e.g., 128×64), you’ll get distorted or cropped graphics. A precise fit eliminates scaling issues.
- Monochrome Preference: For basic LCDs, monochrome images use less data—each pixel is just 1 bit (on or off)—making them faster to process and simpler to code.
Steps to Create Graphics
- Choose an Image Editor: Use tools like GIMP, Photoshop, or even Microsoft Paint.
- Set Dimensions: Create a new canvas matching your LCD’s resolution (e.g., 128×64 pixels).
- Design in Monochrome: Draw or edit your graphic using only black and white. Avoid grayscale or color unless your LCD supports it.
- Save the File: Export as a
.bmpor.pngfor compatibility with conversion tools.
Tip: Test your image on a mock-up of the LCD resolution to ensure it looks right before proceeding.
Converting Images to Data Arrays
Once your graphic is ready, convert it into a byte array—a format the LCD module can interpret. Tools like LCD Assistant or Bitmap2LCD simplify this process, turning your image into code-ready data. You’ll need to configure specific settings and export the result for integration into your project.
Why Byte Arrays?
LCDs don’t understand image files like .bmp or .png. Instead, they need raw pixel data, typically as a byte array, where each bit represents a pixel’s state (on or off in monochrome mode). This array is then loaded into your microcontroller’s code to drive the display.
Conversion Process
- Pick a Tool:
- LCD Assistant: A free, lightweight option for converting images to byte arrays.
- Bitmap2LCD: A more advanced tool with additional features, often used by professionals.
- Image2cpp: An online alternative for quick conversions without software installation.
- Load Your Image: Open your
.bmpor.pngfile in the tool. - Configure Settings:
- Set to monochrome mode to match your image and LCD.
- Verify the pixel dimensions (e.g., 128×64) match your design.
- Export the Data:
- Save as a C array (e.g.,
unsigned char image[] = {...};) or a header file (.h). - Copy this array into your microcontroller code for display.
- Save as a C array (e.g.,
Example Workflow (Using LCD Assistant)
- Open a 128×64 monochrome
.bmpfile. - Set output to “Monochrome” and “Horizontal Byte Orientation.”
- Export as a C array, producing something like:
unsigned char graphic[] = {0xFF, 0x81, 0xBD, ...}; - Add this to your code to render the graphic.
Alternative: Image2cpp
For a web-based option, upload your image to Image2cpp, select monochrome output, and download the generated C array. It’s fast and requires no software setup.
Tip: Double-check the array size matches your LCD’s pixel count (e.g., 128×64 = 8,192 pixels, or 1,024 bytes for monochrome).
Writing LCD Code for Custom Graphics
Displaying custom graphics on an LCD module involves configuring your development environment, writing code to initialize and control the display, and verifying that your graphics render correctly. Below are the detailed steps to achieve this, tailored for beginners and intermediate users alike.
Setting Up the Development Environment
To start, you need a development environment where you can write and upload code to your microcontroller. The Arduino IDE is a great choice due to its simplicity and wide community support. You’ll also need to install libraries that simplify communication with your LCD.
Steps:
- Install the Arduino IDE: Download it from the official Arduino website and install it on your computer. It works with most microcontrollers, including Arduino boards.
- Add Libraries:
- U8g2: This library supports graphic displays, allowing you to draw pixels, shapes, and custom images on monochrome or color LCDs. Install it via Sketch > Include Library > Manage Libraries in the Arduino IDE, then search for “U8g2” by olikraus.
- LiquidCrystal: Use this for character-based LCDs (e.g., 16×2 text displays). It’s pre-installed with the Arduino IDE, but ensure it’s available if you’re working with text grids.
Why It Matters:
Libraries provide pre-built functions to handle low-level communication protocols (like SPI or I2C), saving you from writing complex code manually.
Implementing LCD Code
This section covers writing the code to initialize your LCD, configure it, and display a custom graphic. We’ll use a 128×64 graphic LCD with an ST7920 controller as an example, controlled via software SPI.
Steps:
1. Initialize the LCD Object:
Define the LCD object with the correct pin assignments. For an ST7920-based 128×64 display using software SPI:
U8G2_R0: No rotation (adjust if needed, e.g.,U8G2_R2for 180°).- Pins (13, 11, 10, 8): Match these to your microcontroller’s connections.
					void setup() {
  u8g2.begin();  // Starts the display and prepares it for drawing
}
2. Write the Setup Function:
- Configure the display in the
setup()function. -
u8g2.begin()initializes the LCD and clears its memory.
					#include <U8g2lib.h>
U8G2_ST7920_128X64_1_SW_SPI u8g2(U8G2_R0, /* clock=*/ 13, /* data=*/ 11, /* CS=*/ 10, /* reset=*/ 8);
3. Send Image Data to the Display:
- Use
u8g2.drawBitmap()to render your custom graphic. This requires a byte array representing your image. - Parameters: Starting x/y position, width in bytes (128 pixels / 8 = 16), height, and the image array (
myGraphic). - Page Mode:
firstPage()andnextPage()handle rendering in chunks for memory efficiency.
					void loop() {
  u8g2.firstPage();
  do {
    u8g2.drawBitmap(0, 0, 16, 64, myGraphic);  // x=0, y=0, width=16 bytes, height=64 pixels
  } while (u8g2.nextPage());
}
4. Example Code Structure:
Here’s a complete example for a 128×64 graphic display:
					#include <U8g2lib.h>

U8G2_ST7920_128X64_1_SW_SPI u8g2(U8G2_R0, 13, 11, 10, 8);

// Example image data (replace with your own byte array)
unsigned char myGraphic[] = {
  0xFF, 0xFF, 0xFF, 0xFF, 0xFF, 0xFF, 0xFF, 0xFF,  // First 8 bytes of 128x64 image
  // Add remaining bytes here (total: 1024 bytes for 128x64)
};

void setup() {
  u8g2.begin();
}

void loop() {
  u8g2.firstPage();
  do {
    u8g2.drawBitmap(0, 0, 16, 64, myGraphic);
  } while (u8g2.nextPage());
}
Notes:
- Replace
myGraphicwith your actual image data, typically generated from a tool like LCD Assistant or Image2CPP. - Adjust pin numbers based on your hardware setup.
Testing and Verifying Display
Once your code is ready, upload it to the microcontroller and ensure the graphic displays as intended.
Steps:
- Upload the Code: Connect your microcontroller to your computer, select the correct board and port in the Arduino IDE, and click Upload.
- Check Image Rendering:
- If the image is faint or invisible, adjust the contrast using the potentiometer connected to the LCD’s V0 pin.
- Ensure the backlight is on (if applicable).
- Verify Pixel Alignment and Data Integrity:
- Check that the image isn’t shifted or garbled. If it is, confirm the
drawBitmap()width (e.g., 16 bytes for 128 pixels) matches your display. - If pixels are missing, ensure your byte array size matches the display resolution (e.g., 128×64 = 1024 bytes).
- Check that the image isn’t shifted or garbled. If it is, confirm the
Troubleshooting:
- No Display: Check wiring, power, and pin assignments.
- Scrambled Image: Verify the byte array and LCD resolution compatibility.
Advanced Customization Techniques for Graphic LCD Modules
Once you’ve mastered the basics of displaying static images on your graphic LCD module, you can elevate your projects with advanced techniques like animations, custom fonts, and support for various resolutions and color depths. These features allow you to create dynamic and engaging displays. This guide walks you through each technique, providing clear steps and examples to help you implement them successfully.
Animating Graphics
Animations bring your display to life by creating the illusion of movement. On a graphic LCD, this is achieved by updating the pixel data sequentially, similar to a flipbook. Here’s how to implement simple animations using frame buffers.
How It Works
- Frame Buffers: A frame buffer stores pixel data for the entire display. By updating the buffer with new data and sending it to the LCD in sequence, you can create smooth animations(What Is a Frame Buffer and How Does It Work in Embedded Systems?).
- Clearing and Sending Buffers: Use
u8g2.clearBuffer()to reset the buffer before drawing new content, andu8g2.sendBuffer()to update the display. This prevents “ghosting” (leftover pixels from previous frames) and ensures clean transitions. - Cycling Through Data Arrays: Prepare multiple data arrays (each representing a frame) and cycle through them in a loop to create animation effects.
Example: Simple Blinking Animation
Let’s create a blinking icon with two frames: one with the icon on and one off.
- Prepare Data Arrays:
icon_on[]: Byte array for the icon when visible.icon_off[]: Byte array for the icon when hidden (e.g., all pixels off).
- Code:
					void loop() {
  u8g2.clearBuffer();
  u8g2.drawBitmap(0, 0, 16, 64, icon_on);  // Draw icon on
  u8g2.sendBuffer();
  delay(500);  // Show for 500ms

  u8g2.clearBuffer();
  u8g2.drawBitmap(0, 0, 16, 64, icon_off);  // Draw icon off
  u8g2.sendBuffer();
  delay(500);  // Hide for 500ms
}
- This alternates between showing and hiding the icon every half second, creating a blinking effect.
Tips:
- Minimize delays between frames for smoother animations.
- Precompute frames to avoid processing delays during runtime.
Custom Fonts and Text
Text enhances your display’s functionality and aesthetics. The U8g2 library offers a variety of fonts to customize text styles and sizes, making your interface more readable and appealing(How Can You Create Custom Characters on an Character LCD?).
How to Use Custom Fonts
- Select a Font: U8g2 provides fonts ranging from small and simple to large and decorative. Choose one that suits your display’s resolution and design.
- Set the Font: Use
u8g2.setFont(font_name)to select a font before drawing text. - Draw Text: Use
u8g2.drawStr(x, y, "Your Text")to display text at specific coordinates.
Example: Displaying Text with a Custom Font
Here’s how to display “Hello, World!” using a bold, 8-pixel font:
					void setup() {
  u8g2.begin();
}

void loop() {
  u8g2.clearBuffer();
  u8g2.setFont(u8g2_font_ncenB08_tr);  // Bold 8-pixel font
  u8g2.drawStr(0, 10, "Hello, World!");  // Draw text at (0,10)
  u8g2.sendBuffer();
}
- Font Options: Check the U8g2 documentation for a full list of available fonts.
Combining Text and Graphics
Mix text and graphics for a richer interface. For example, display a label next to an icon:
					u8g2.drawBitmap(0, 0, 16, 64, myIcon);  // Draw icon
u8g2.setFont(u8g2_font_6x10_tr);        // Set 6x10 font
u8g2.drawStr(20, 10, "Status: OK");     // Draw text beside icon
Tips
- Match font size to your display’s resolution to avoid clipping.
- Use
u8g2.setFontDirection()to rotate text if needed.
Handling Different Resolutions and Color Depths

Graphic LCD modules vary in resolution and color capabilities. Adapting your code to these differences ensures your graphics display correctly across different screens(Color Depth Processing for LCD Panels with LED Backlighting).
Adapting to Higher Resolutions
- Buffer Size: Larger displays (e.g., 240×128) require bigger frame buffers. U8g2 adjusts this automatically based on the display type you initialize.
- Adjust Coordinates: Scale your drawing coordinates to fit the new resolution. A 240×128 display offers more space for elements.
Example: Scaling from 128×64 to 240×128
For a 240×128 display:
- Update the LCD object to match the controller and resolution.
- Adjust drawing functions:
u8g2.drawBitmap(0, 0, 30, 128, myLargeGraphic); // 240 pixels / 8 = 30 bytes wide
Working with Color Displays

- Color Data Formats: Color displays use RGB data (e.g., 16-bit 5-6-5 RGB) instead of monochrome bits.
- Compatible Controllers: Monochrome controllers like SSD1306 won’t work for color. Use controllers like SSD1331 for color OLEDs.
- Library Support: U8g2 supports color displays with appropriate functions (e.g.,
u8g2.drawPixel(x, y, color)).
Example: Drawing on a Color OLED
For a 96×64 color OLED with an SSD1331 controller:
					U8G2_SSD1331_96X64_UNIVISION_1_4W_HW_SPI u8g2(U8G2_R0, /* cs=*/ 10, /* dc=*/ 9, /* reset=*/ 8);

void loop() {
  u8g2.clearBuffer();
  u8g2.drawPixel(10, 10, 0xF800);  // Red pixel (16-bit RGB: 11111 000000 00000)
  u8g2.sendBuffer();
}
Tips:
- Verify your display’s resolution and color depth in its datasheet.
- Ensure image data matches the display’s color format.
Related Articles:
What Is the Typical MTBF for Commercial LCD Modules?
How to Show Right-to-Left Text on LCD Screens?
How Is LCD Backlight Protection Against Reverse Polarity Confirmed?
What’s the Key Difference Between DVI-I and DVI-D Connectors?
How Does PWM Control Backlight Brightness in Modern Displays?
FAQ
How to Avoid Flickering in LCD Animations?
Use double buffering with u8g2.clearBuffer() and u8g2.sendBuffer() for smooth transitions. Optimize frame rates to match the LCD’s refresh capabilities.
What Happens If My Image Resolution Doesn’t Match the LCD?
Mismatched resolutions cause distorted or partial displays. Resize images to match the LCD’s pixel dimensions (e.g., 128×64) before conversion.
Why is my image showing distorted or misaligned?
This usually means the bitmap dimensions or orientation don’t match the display’s buffer settings. Double-check width, height, and byte order.
How do I power both logic and backlight safely?
Use separate lines or add decoupling capacitors and resistors. This avoids flickering or display noise from current spikes.
Is it possible to update only part of the screen?
Yes, by setting partial refresh areas in the buffer. This saves memory and increases update speed, especially for animations.