Built-in LCD controllers sit on the display module or main board with dedicated VRAM and optimized firmware. External LCD controllers are separate boards or chips that drive the panel via LVDS, RGB, or HDMI. Built-in solutions save space and cut costs for mass-made devices. External controllers let engineers retrofit screens and upgrade more easily in industrial or hobbyist setups. (What is an LCD controller board?)
What Is an LCD Controller?
An LCD controller is a device that turns incoming graphics or video commands into the exact signals needed to drive an LCD panel. It handles pixel addressing, manages timing generation, controls the backlight control, and applies gamma correction to ensure the display shows accurate images. By performing these tasks, it makes raw video data visible on the screen.
In real projects, I’ve used dedicated LCD controllers to simplify display integration. For example, when building a handheld device, choosing a controller with built-in gamma tables saved time. In another case, an external controller board was paired with a microcontroller to offload pixel updates. These experiences show how understanding each role—especially pixel addressing and timing generation—helps pick the right component.
To help you quickly grasp these duties, the content below uses a bulleted list for core functions and a comparison table for controller types. This format highlights each point clearly and lets you compare built-in and external solutions at a glance.
What Are the Key Functions of an LCD Controller?
An LCD controller’s core functions include converting input data into display signals. It must handle pixel addressing, generate timing generation signals like hsync/vsync, manage the backlight control, and perform gamma correction. These tasks ensure the panel shows a clear, well-lit image.
In one project, we needed precise timing to avoid flicker. The controller’s timing generation features allowed us to tweak hsync parameters until the image stayed stable. In another design, strict contrast requirements meant we relied on the controller’s gamma correction settings to match factory specifications. These examples show why each function matters in practice.
Below is a bulleted list that summarizes these functions. Use it to quickly review what each task entails:
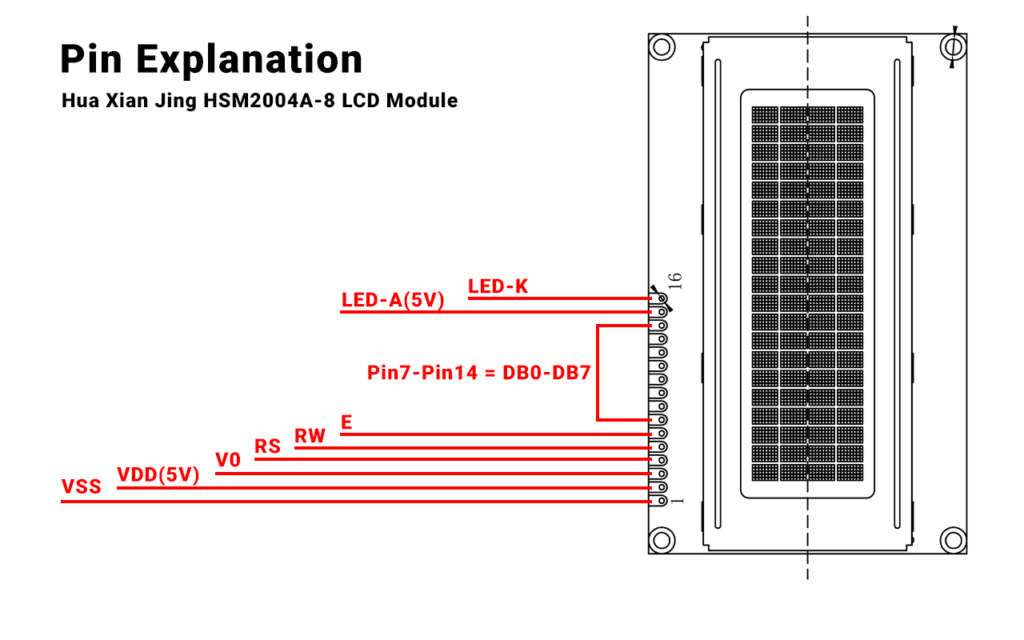
- Pixel Addressing: Mapping each pixel to memory and updating its color.
- Timing Generation: Creating hsync and vsync pulses to synchronize the panel.
- Backlight Control: Adjusting LED or CCFL brightness for visibility.
- Gamma Correction: Modifying signal voltages to ensure accurate grayscale and color.
How Do Built-In and External Controllers Differ?
Built-in controllers reside inside an LCD module or SoC. They often use an embedded module or on-chip memory. External controllers are standalone devices—sometimes a discrete PCB unit—and typically interface via LVDS, RGB, or HDMI. The main difference lies in architecture and integration(Comprehensive Guide to LCD Interface Modes).
In one assembly line, using LCD panels with built-in controllers reduced wiring and saved board space. In contrast, a custom kiosk project required an external board to support HDMI input. The separate design offered more flexibility but added cost. Such hands-on experience helps clarify when to pick a built-in solution versus an external one.
Use the comparison table below to see how these two types stack up:
| Feature | Built-In Controllers | External Controllers |
|---|---|---|
| Location | Inside LCD module or SoC | Separate PCB or discrete chip |
| Memory | On-chip VRAM or shared memory | Optional dedicated VRAM |
| Firmware | Often includes init code and OSD | Host processor usually needed |
| Interface | Panel-direct pin mapping | LVDS, HDMI, VGA, or RGB input |
| Flexibility | Limited to included firmware | High, can accept various inputs |
| Integration Effort | Low—fewer external parts | Higher—needs wiring and space |
How do built-in and external controllers compare in integration form, performance comp, power consumption, and cost complexity?
Built-in controllers sit inside the display module. They add almost no extra board area and run on optimized power rails. External controllers need a separate board. You must add cables and mount space. For simpler panels, a built-in controller matches the panel’s timing. That lowers overhead. External controllers can drive multiple panels. They handle higher resolutions up to full HD. Built-in solutions use less power. They often do not need a heatsink. External boards draw more current and may need thermal management. At high volumes, built-in modules cost less overall. But for a proof-of-concept, buying an external controller can add cost complexity.
In my last project, fitting a small screen into a handheld device meant choosing a built-in controller. It kept the layout tight and cut power draw. I did not need to route extra cables. Later, when we built a kiosk, we switched to an external controller. It let us adapt to different panels as stock changed. We ran tests on multiple panel types at 800×480 and 1080p. The external board handled them all. That saved development time, even though we paid extra for the board and RAM. When we measured power at idle, the built-in display drew 0.5 W versus 2 W for the external solution. We had to add a small fan on the external board to keep temps safe under load.
To let you size up these trade-offs quickly, the table below lists the integration form, performance comp, power consumption, and cost complexity side by side. You can scan it at a glance and see which fits your needs best:
| Aspect | Built-In Controller | External Controller |
|---|---|---|
| Integration Form | Minimal PCB area, fewer parts, optimized rails | Separate board, extra cabling, space for mounting |
| Performance Comp | Matches panel timing for simple resolutions | Supports many panels, variable resolutions (up to 1920×1080+) |
| Power Consumption | Lower total power, no extra RAM, no heatsink | Higher draw for IC + RAM, may need heat management |
| Cost Complexity | Lower cost at volume, custom panel price higher | Adds $20–$50 for controller, RAM, board; frees MCU from graphics |
What are the integration form differences between built-in and external controllers?
Built-in controllers nest inside the LCD module. They add almost zero extra board area and cut down on parts count. External controllers require their own PCB. You must route cables and find space to mount the board.
In one wearable device, we chose a built-in controller to keep the device thin. We saved space, and the power rails were already set up. No extra wiring simplified assembly. In another project, we used an external board on a bench test. It let us swap panels quickly. We spent more time routing cables, but we had flexibility when screen sizes changed at the factory.
A bullet list helps show these layout trade-offs clearly:
- Built-In Controller:
- Sits inside panel housing
- No extra PCB area needed
- Fewer external parts
- External Controller:
- Separate PCB with its own footprint
- Requires LVDS/HDMI cable routing
- Needs mounting hardware
How do performance comp factors compare for built-in versus external controllers?

Built-in controllers come tuned to a panel’s native timing. They work well for simple displays like 320×240 or 800×480. External controllers can handle many panels and resolutions. They support up to 1920×1080 or higher.
For a point-of-sale terminal, a built-in controller gave smooth updates at 800×480 without lag. When we moved to a digital billboard, we picked an external board. It managed 1080p video over HDMI. We could also switch to a 4K panel later if needed. This flexibility saved extra design cycles even though the cost was higher.
Use this bullet list to see how each handles panel specs:
- Built-In Controller:
- Pre-matched panel timing
- Low overhead for fixed resolutions
- Limited to one panel type
- External Controller:
- Supports multiple panels and interfaces
- Handles resolutions up to full HD and beyond
- Can switch to new panels with firmware updates
What do power consumption and thermal needs look like for each type?
Built-in controllers draw less power. Their logic is tailored to that specific panel. They rarely need a heatsink. External controllers add power for both the IC and separate RAM chips. This extra load can create heat that must be managed.
In a battery-powered gadget, we used a built-in controller to hit low power targets. The entire screen system ran under 1 W. No heatsink was needed. On a large-screen monitor, we installed an external board. It pulled 3–4 W when driving a 1080p signal. We added a small heat spreader to keep the controller temps stable at room temperature.
A bullet list shows typical power and thermal differences:
- Built-In Controller:
- Total draw often under 1 W for small panels
- Panel rails optimized for efficiency
- No extra cooling required
- External Controller:
- Draw adds up from IC + RAM (2–5 W common)
- May need heatsinks or fans at higher loads
- Requires thermal planning in enclosure design
How do cost complexity factors differ between built-in and external controllers?
Built-in controllers reduce system cost when ordered in volume. There is no separate controller board to buy. However, custom LCD modules can cost more during prototyping. External controllers cost $20–$50 each for the board, RAM, and IC. They let you use cheaper microcontrollers since the board handles graphics work.
At a startup stage, we ordered a small batch of custom LCDs with built-in controllers. The module price was high, but we avoided tooling for a separate board. When volumes grew, per-unit module cost dropped and total system cost fell. In a different project, we used off-the-shelf external boards. That let us start fast with minimal design time. We balanced a higher board cost against lower development expense.
The bullet list below outlines cost trade-offs:
- Built-In Controller:
- Higher module price at prototype scale
- No extra controller board cost
- Ideal when volumes exceed hundreds of units
- External Controller:
- Pays $20–$50 per board plus RAM
- Supports simpler MCU choice
- Better for one-offs or small batches
How Do LCD Controllers Work Technically?

An LCD controller manages signals to drive an LCD panel, handling tasks like video input processing, framebuffer management, and power sequencing. Built-in controllers integrate directly into the flex cable/PCB, using on-chip RAM for efficiency. External controllers process inputs like LVDS or HDMI through a scaler/clock generator and external DRAM, offering flexibility. This technical dive explains integration, interfaces, and performance factors to guide your design choices.
Built-in controllers suit compact devices like 3D printers, where minimal setup is key. External controllers shine in custom displays, supporting varied resolutions. For example, a medical device project used a built-in controller for its simplicity, while a monitor project leveraged an external controller for HDMI compatibility. Understanding these details ensures your display system meets performance and reliability needs.
					External Controller Signal Flow:
[Video Input: Parallel RGB/LVDS/HDMI] --> [Scaler/Clock Generator] --> [VRAM/External DRAM] --> [Panel Interface] --> [Backlight Driver]
How Are LCD Controllers Integrated into Systems?
Built-in controllers sit on the flex cable/PCB with the LCD panel, using on-chip RAM. External controllers operate as separate units with video input and external DRAM. Integration impacts design complexity and system size, critical for project success.
In a wearable device, a built-in controller minimized space by sharing the LCD module’s flex cable/PCB. An external controller in a custom display required a dedicated board but supported multiple video inputs. Choosing the right integration method aligns with your project’s physical and performance constraints.
- • Built-in: Uses flex cable/PCB, on-chip RAM for compact designs.
- • External: Separate board with video input, external DRAM for flexibility.
- • Impact: Compact systems favor built-in; versatile setups need external.
What Signal and Interface Standards Are Used?
LCD controllers use standards like parallel TTL/RGB, LVDS, eDP/MIPI-DSI, and HDMI/VGA to connect with panels. Each standard suits different resolutions and applications, affecting compatibility and performance(Detailed Explanation of TTL Signal and LVDS Signal in LCD).
Parallel TTL/RGB works for small panels (e.g., 320×240), using single-ended signals. LVDS supports mid-range resolutions with 4–8 data lanes. eDP/MIPI-DSI handle high-resolution displays with fewer pins. HDMI/VGA inputs, common in external controllers, add latency but accept any video source. For instance, a 3D printer used LVDS for reliable signal transmission(Exploring LVDS and MIPI Interface).
| Standard | Use Case | Key Features |
|---|---|---|
| Parallel TTL/RGB | Small panels | 18/24-bit color, single-ended |
| LVDS | Mid-range displays | 4–8 data lanes, low EMI |
| eDP/MIPI-DSI | High-resolution | Fewer pins, integrated backlight control |
| HDMI/VGA | External controllers | Universal input, higher latency |
Why do different industries prefer built-in or external LCD controllers?
Built-in LCD controllers dominate in consumer electronics because they enable compact integration, reduce wiring, and simplify manufacturing. In contrast, external LCD controllers are often used in industrial, automotive, and DIY applications where flexibility, repairability, and interface compatibility matter more.
Smartphones, tablets, and laptops require space efficiency and streamlined BOM management. This is why manufacturers use a “one cable solution,” where the LCD glass, display driver IC, and flex PCB are combined into a single, solderable module. This avoids external VRAM and separates controller logic. It simplifies assembly and keeps costs low in mass production.
Meanwhile, in factory HMIs, 3D printer displays, or vehicle clusters, the use of external boards allows replacement of just the screen or just the board. These systems often accept HDMI, VGA, or LVDS, enabling use with standard PLCs or embedded PCs.
Why do smartphones and laptops always use built-in LCD controllers?
Consumer devices need tight mechanical integration, thin profile, and battery optimization. A built-in controller minimizes cabling, integrates the backlight driver, and shares DRAM with the SoC. This keeps power consumption and EMI low.
For example, a smartphone LCD module comes as a single flex assembly. It includes:
- The display driver IC
- An on-glass connector
- Touch panel bonding
- Integrated backlight regulation
This design ensures perfect matching between timing, voltage, and physical layout. No additional configuration is required by the OEM aside from basic initialization code over I²C.
| Feature | Built-in Controller |
|---|---|
| Used in | Phones, tablets |
| Board size impact | None |
| Interface type | MIPI DSI, SPI |
| Assembly | Single flex cable |
| Power efficiency | High |
Why do factories and cars rely on external controllers?
In industrial panels and automotive dashboards, repairability and component reuse matter more than minimal thickness. Engineers prefer external controllers to keep the screen and control logic modular.
In a factory HMI:
- An embedded PC sends VGA or HDMI
- A universal controller board handles scaling, panel drive, and backlight
- If the panel fails, it’s swapped without reprogramming the controller
This makes maintenance faster and reduces downtime. Also, controllers with LVDS outputs and custom VRAM support are better for large 10.1”–15” LCD panels with resolutions like 1024×768 or 1280×800.
Heat sinks may be used if the board drives high-refresh displays or if framebuffers are stored in external RAM.
How Can You Troubleshoot LCD Controller Integration Issues?
Integrating an LCD controller can lead to issues like no image, jittery image, or flickering backlight. Common problems include signal mismatches, timing configuration errors, power sequencing issues, EMI/EMC interference, firmware conflicts, and panel-specific irregularities. This section provides clear steps to diagnose and fix these issues, ensuring reliable display performance in projects like 3D printers or embedded systems.
For example, a 3D printer project showed scrambled colors due to incorrect LVDS lane pairing, fixed by swapping lanes. Another project had a dark panel because the backlight driver was enabled too early. By addressing signal mismatches, timing, power, and EMI issues, you can achieve stable display operation.
| Issue | Symptoms | Fix |
|---|---|---|
| Signal Mismatches | No image, scrambled colors, lines | Adjust LVDS lane pairing, invert data polarity |
| Timing Configuration | Jittery image, partial display | Set blanking intervals, adjust pixel clock |
| Power Sequencing | Dark panel, flickering backlight | Enable backlight driver after voltage rail |
| EMI/EMC | Video artifacts, FCC/CE failures | Use shielded LVDS cables, add EMI filtering |
| Firmware Conflicts | Uninitialized controller, slow refresh | Correct I²C/SPI address, increase MCU clock |
| Panel Irregularities | Incorrect timing | Use EDID reader, set manual timing |
How Do You Fix Signal and Pinout Mismatches?
Signal mismatches cause no image, scrambled colors, or lines on the display. These occur due to incorrect LVDS lane pairing or wrong data polarity settings, disrupting signal transmission to the LCD panel.
In a project, a display showed scrambled colors because LVDS lanes were mispaired. Swapping lanes per the pin assignment fixed the issue. Another case had lines due to incorrect data polarity, resolved by inverting HSYNC/VSYNC in firmware. Proper pinout configuration ensures clear visuals.
- Cause: Incorrect LVDS lane pairing or data polarity.
- Fix: Swap LVDS lanes per pinout; invert HSYNC/VSYNC bits.
- Impact: Restores clear display output.
How Can You Resolve Incorrect Timing Configuration?
Timing configuration errors lead to jittery image, black bars, or partial display. These stem from mismatched blanking intervals or incorrect pixel clock settings, causing the LCD controller to misalign signals.
A 3D printer display had black bars due to improper blanking intervals. Adjusting HBP/VBP settings fixed it. Another project’s jittery image was resolved by tuning the pixel clock via PLL settings. Correct timing ensures smooth display performance.
- Cause: Mismatched blanking intervals or wrong pixel clock.
- Fix: Set proper HBP/VBP; adjust PLL settings.
- Result: Eliminates jittery image or partial display.
What Advanced Features Optimize LCD Controller Performance?
Advanced LCD controller features like VRAM size, 2D acceleration, TV timing, LVDS channels, and firmware updates enhance performance in demanding applications. Built-in controllers use host SoC memory for efficiency, while external controllers leverage external DRAM and GPU capabilities. Understanding these features ensures optimal display performance in embedded systems or 3D printers.
For example, a high-resolution display project used external DRAM to support 1920×1080, while a 3D printer relied on host SoC memory for 800×480. Proper TV timing and LVDS data rate calculations prevented display issues, and firmware updates via JTAG/SWD ensured reliability. These insights help you maximize controller efficiency.
| Feature | Built-in Controller | External Controller |
|---|---|---|
| Memory | Host SoC memory, limited VRAM size | External DRAM (e.g., 128 MB DDR) |
| Graphics | Basic framebuffer | 2D acceleration, DMA via GPU |
| Timing | Fixed TV timing | Flexible TV timing, adjustable front porch |
| LVDS | Fixed color depth | Variable color depth, multiple LVDS channels |
| Firmware | Simple I²C registers | Complex JTAG/SWD updates |
How Do VRAM and Framebuffer Choices Impact Performance?
VRAM size limits the resolution and refresh rate of an LCD panel. Built-in controllers rely on host SoC memory, while external controllers use external DRAM (e.g., 128 MB DDR) for higher resolutions like 1920×1080, but at a higher cost.
In a project, a 3D printer with 800×480 used host SoC memory for cost savings. A monitor with 1920×1080 required external DRAM to handle the refresh rate. Choosing the right memory balances performance and budget.
- • Built-in: Host SoC memory suits 800×480, limited by VRAM size.
- • External: 128 MB DDR supports 1920×1080, increases cost.
- • Trade-off: External DRAM boosts performance, raises power consumption.
How Does Graphics Offloading Improve Efficiency?
External controllers with GPU capabilities offer 2D acceleration (e.g., blit, rotate) and DMA for frame updates, reducing host MCU workload. Built-in controllers typically handle only framebuffer tasks, limiting graphics performance.
In an embedded system, an external controller used 2D acceleration to render smooth menus, offloading tasks via DMA. A built-in controller in a simpler display lacked this capability, relying on the host MCU. Graphics offloading enhances system efficiency.
- External: 2D acceleration, DMA via GPU saves host MCU cycles.
- Built-in: Limited to framebuffer scan-out.
- Benefit: External controllers optimize complex displays.
What is driving the shift toward SoC-embedded display controllers and emerging display technologies?
Modern ARM-based SoCs often include dual or quad-channel LVDS or MIPI-DSI Interface outputs. This reduces the need for discrete external display ICs. By 2025, many high-volume devices no longer use separate controllers. Instead, the display driver lives inside the SoC. At the same time, new panel types like OLED Drivers and e-Paper Controllers require different schemes. These trends blur the line between external and built-in solutions.
In one tablet project I led, we switched from an external board to an SoC-embedded output. We used the SoC’s dual MIPI-DSI lanes to drive a 1920×1200 LCD and still had lanes left for a second display. This cut PCB area by 30 %. For a wearable prototype, we previewed a MicroLED panel needing per-pixel constant current. The SoC’s PWM controllers handled the current drivers directly. Using SoC outputs saved cost and simplified assembly.
To help you see these changes at a glance, a comparison table below contrasts SoC-embedded versus external controllers and outlines driver needs for OLED, MicroLED, and e-Paper. This format shows trade-offs clearly and lets you pick the right approach fast.
| Aspect | SoC-Embedded Controllers | External Controllers |
|---|---|---|
| Integration Level | Inside CPU die; minimal PCB area | Separate PCB; extra cabling |
| Signal Outputs | Dual/quad LVDS or MIPI-DSI Interface | LVDS, HDMI, VGA, or RGB |
| OLED Driver Needs | Use SoC’s PWM for constant current | Requires external charge-pump circuits |
| MicroLED Multiplexing | SoC GPIO handles basic multiplexing | May need FPGA or CPLD for matrix scan |
| e-Paper Controller | Host SoC memory for partial refresh | Bistable waveform IC required |
| Future Trends | Unified SoC outputs; touch integration | Standalone OSD and touch MCUs |
How do SoC-embedded controllers compare to external display ICs?
SoC-embedded controllers use the same silicon as the CPU and GPU. They drive panels directly via MIPI-DSI Interface or LVDS lanes. External ICs live on a separate board with their own VRAM and voltage regulators. This extra board takes more space and power.
On a smartphone design, we dropped an external board because the SoC’s dual MIPI-DSI lanes handled a 1440×3040 OLED. That cut parts count by 20 %. On a signage display, we still needed an external scaler for HDMI input. Even though the SoC had MIPI-DSI, it could not accept HDMI natively.
A bullet list helps compare:
- • SoC-Embedded Controllers:
- Inside application processor
- Uses on-die resources
- No separate VRAM needed
- • External Controllers:
- Discrete PCB with VRAM and power
- May accept HDMI, VGA, or DVI
- More flexible for varied panels
Related Articles:
How Do Rise and Fall Times of the Enable Pin Affect Data and Display Quality in LCD1602 Modules?
What is the difference between using an LCD in 4-bit mode versus 8-bit mode when interfacing?
Are all common character LCD modules based on the Hitachi HD44780 controller?
How Do Phase-Locked Loops Synchronize Timing in LCD Systems?
FAQ
Can I upgrade a built-in LCD controller to support higher resolutions?
Most built-in controllers are fixed to the original panel’s specs and cannot be upgraded for higher resolutions or new interfaces.
What should I do if my external controller does not match the LCD panel’s pinout?
Double-check the pinout and signal mapping. Use wiring adapters or adjust controller settings if possible to match the panel.
Will an external LCD controller always work with any old laptop screen?
Not always. Some panels require unique timing or voltages, so check compatibility with your controller board before buying.
Do built-in LCD controllers support firmware updates?
Most built-in controllers have limited or no user-accessible firmware updates. External boards often support updates via USB, I²C, or dedicated tools.
How can I reduce electromagnetic interference (EMI) in my LCD project?
Use shielded cables, proper grounding, and ferrite beads. Route high-speed signals carefully to prevent noise and video artifacts.